The Beautiful Art Of Pisanki
(Or, Polish 'Written' Eggs)
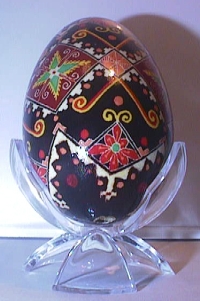

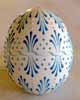
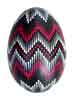
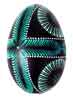
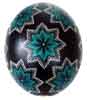
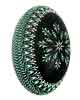
The name 'Pisanki' comes from the Polish verb: pisac, "to write." The eggs are decorated with traditional Polish symbols of Easter. The most popular designs are: the Lamb with Resurrection Banner (Baranek, symbolizing the Lamb of God from the Agnus Dei of the Catholic Mass), the pussy willow (often used instead of palms in Poland), the Cross, or Easter greetings. Different regions of Poland have also developed particular geometric and floral designs specific to their communities. The decorating of eggs has been a part of Polish history for more than 1,000 years. The first pisanki were found near Opole, Poland, and date from the tenth century, as the egg is considered a symbol of life. According to Rev. Krysa, Polish Easter eggs fall into the following categories: Pisanki ~ "written" eggs; dyed with a batik process; Kraszanki ~ solid colored eggs dyed with plant materials; Malowanki ~ hand painted eggs; Drapanki ~ solid colored eggs with designs scratched into the surface; Wyklejanki ~ eggs decorated with bull-rush pith & yarn; Nalepianki ~ eggs with paper cut-outs, or straw glued to them. The art of pisanki involves applying intricate designs and lines in melted beeswax to the shell of an egg, often blown, then placing the egg into numerous dye-baths. In short, here is how they are created: The egg is washed with soap, and the insides of quail or chicken eggs, are blown out.
Then, the design in sketched in pencil, and;
Hot beeswax is applied to the eggshell using the head of a pin.
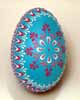
Dying the eggshell is next, (the waxing and dyeing is continued, working from light to dark, until the desired number of colors is achieved),
The beeswax is removed by melting it, and wiping it away,
To preserve the beauty, a covering with an oil based varnish (2-3 thin coats) give it a beautiful gloss! Here are the same instructions, in more detail, for those interested in ancient folk art: From "Polish American Way Recipes and Traditions" by Jacek Nowakowski.
Polish American Journal, March 1997 SUPPLIES. Medium, raw eggs at room temperature, vinegar, a small cake of beeswax, a candle (taper) in a low stand, a pisak or stylus, aniline dyes (yellow, orange, green, red, violet, brown, black) prepared in water and vinegar, a spoon, paper towels, tissues, one large and one small safety pin, a stiff wire (about 6 inches long), a small bowl, clear, glossy varnish, waxed paper. STEP BY STEP: 1. Having wiped the egg with a paper towel moistened in some vinegar, heat the metal ends of the stylus over the candle flame. The hot stylus is touched to the beeswax to form a puddle of molten wax which enters the stylus and becomes the "ink" in this batik process.
2. Write with the molten wax on the egg. Always write away from yourself, turning the egg when necessary. Wherever molten wax appears on the egg, the dye will not color it. Hence a batik process. The egg is divided into eight sections. From each intersecting point, write a small curled cane, always working away from yourself.
3. Place in the yellow dye bath.
4. Remove from the yellow dye bath after about 10 minutes, pat dry with a paper towel. Allow the egg to set for 5 minutes.
5. Write the rungs of the ladders on the yellow egg. After completing the rungs, place the egg in the orange dye, remove and write the "teeth" on each final rung. Place into purple dye for about 10 minutes. Remove, and let set until dry.
6. Hold the egg with the waxed portion next to the candle flame (not over, or in, the flame; to avoid scorching). When the wax melts, turning shiny, quickly yet gently wipe off the molten wax with a facial tissue in one stroke. Repeat until the entire egg is cleaned.
7. To preserve the egg, and deepen the colors, varnish with index finger (two coats), leaving to dry on waxed paper.
8. Let stand overnight. Make a hole with a small safety pin at one end large enough to insert a thin, rigid wire. Break the yoke with the wire and scramble the contents. Make a small hole in the opposite end.
9. Gently, yet firmly, clasp the egg and blow into the smaller hole; the scrambled contents will slowly be forced out through the larger hole. Your egg is done.Recently, I've been seeing some beautifully, and laboriously, decorated eggs from Poland, and I thought I'd make them, and Easter in Poland in general, my theme this year! :)